Quick ID Guide
Root Damage & larvae
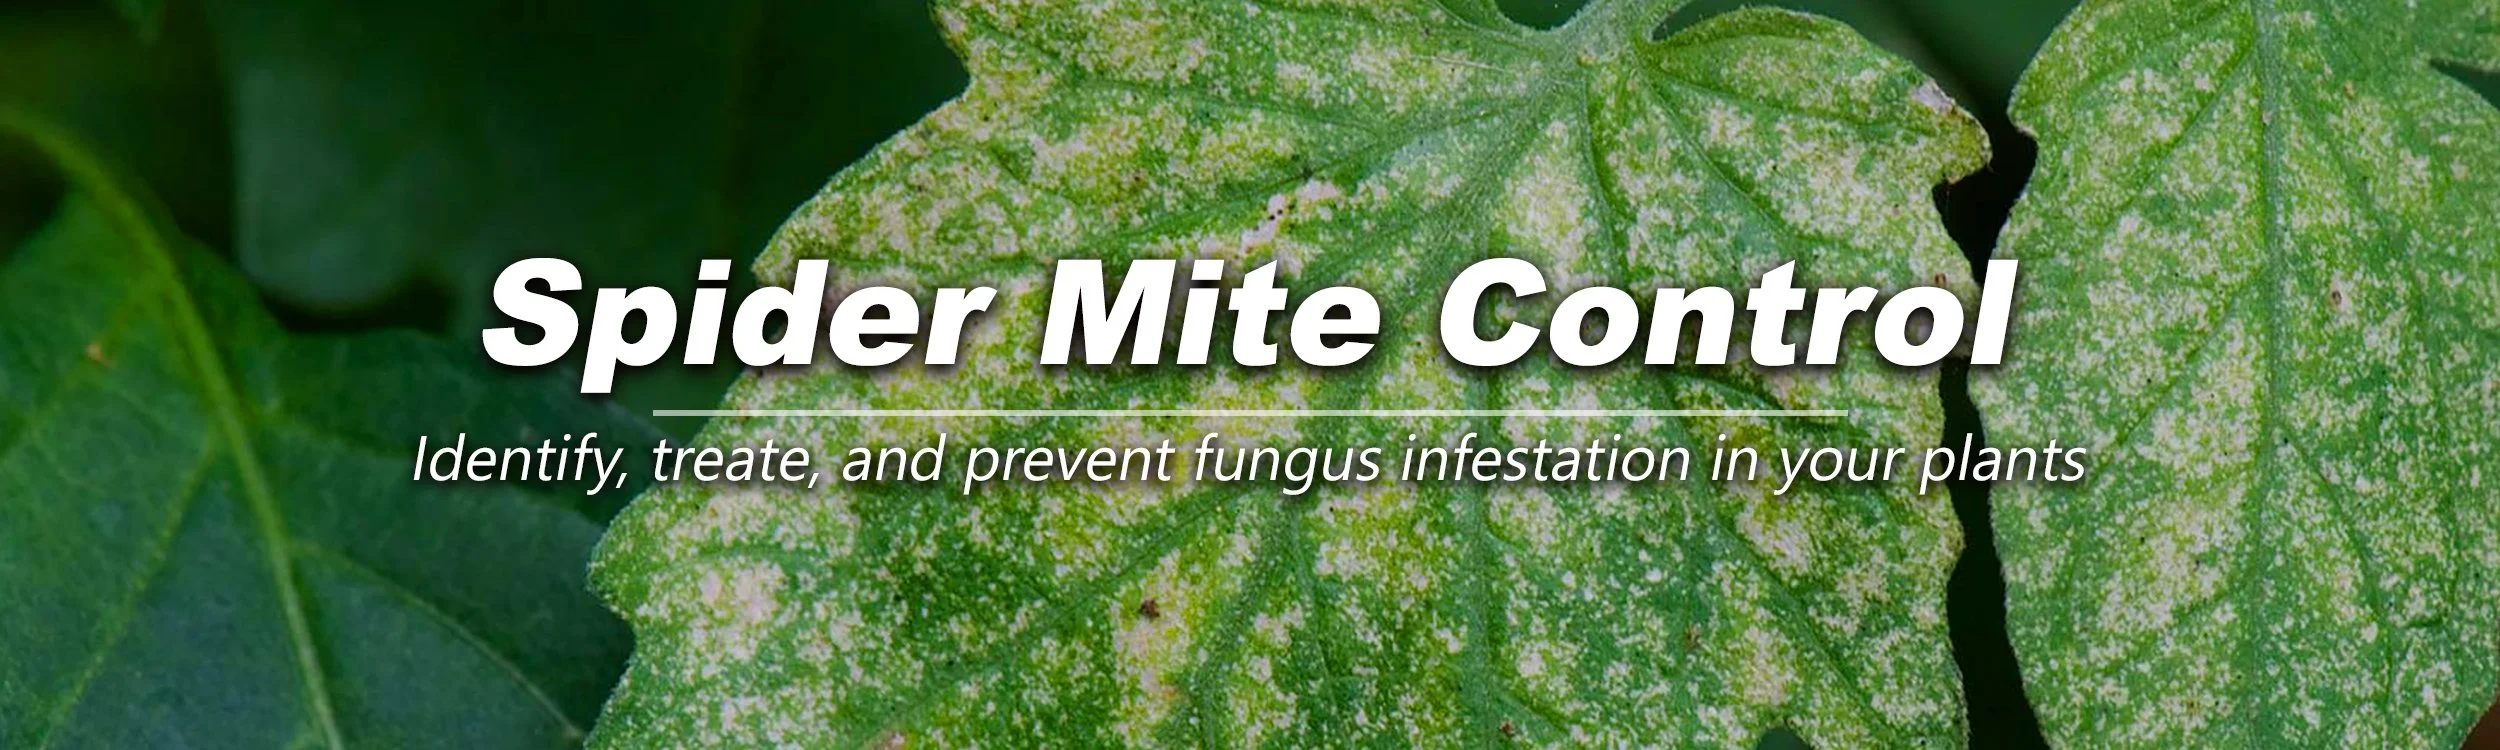
What You’ll See
Quickly identify a spider mite infestation by spotting classic spider mite symptoms—fine webbing, stippling, leaf discoloration, and tiny moving mites on plant leaves.
Checklist
☐ Fine spider webbing on leaf undersides, stems, or between nodes (especially in heavy infestations)
☐ Stippling: tiny pale/yellow specks across the leaf surface (sucked-out “pin dots”)
☐ Leaf yellowing (chlorosis) that starts as speckles and spreads
☐ Bronzing or rust-colored leaves on older or stressed foliage
☐ Dry, crispy leaf edges or curled leaves (upward/downward cupping)
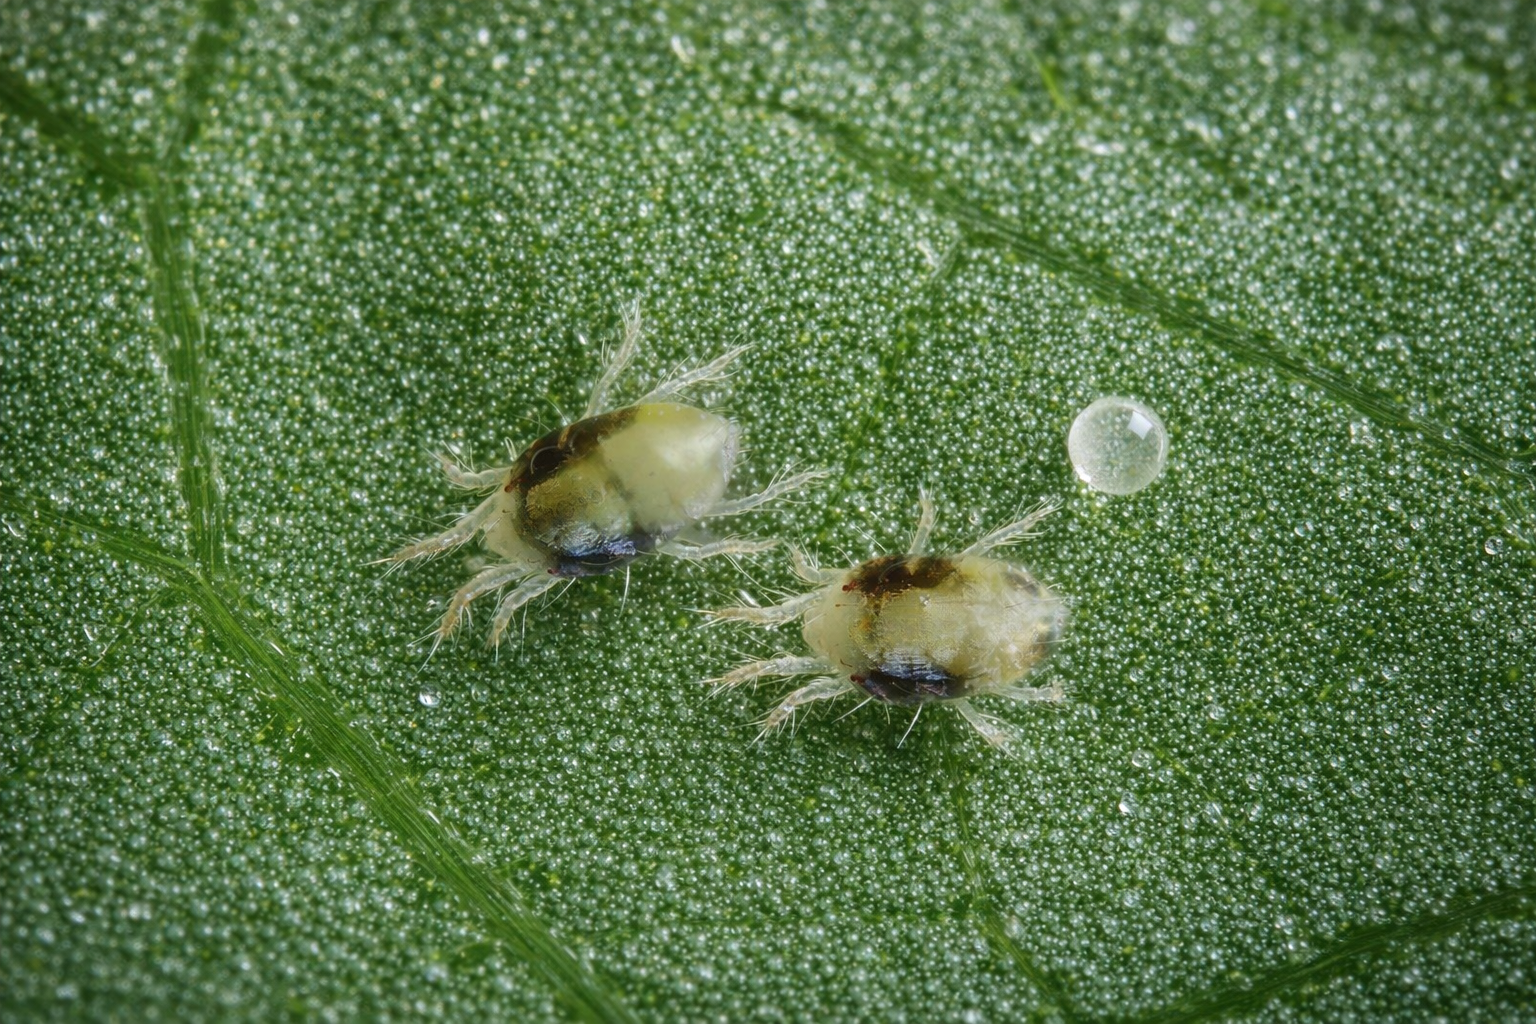
☐ Tiny mites (often red, brown, tan, or translucent) moving slowly—hard to see without magnification
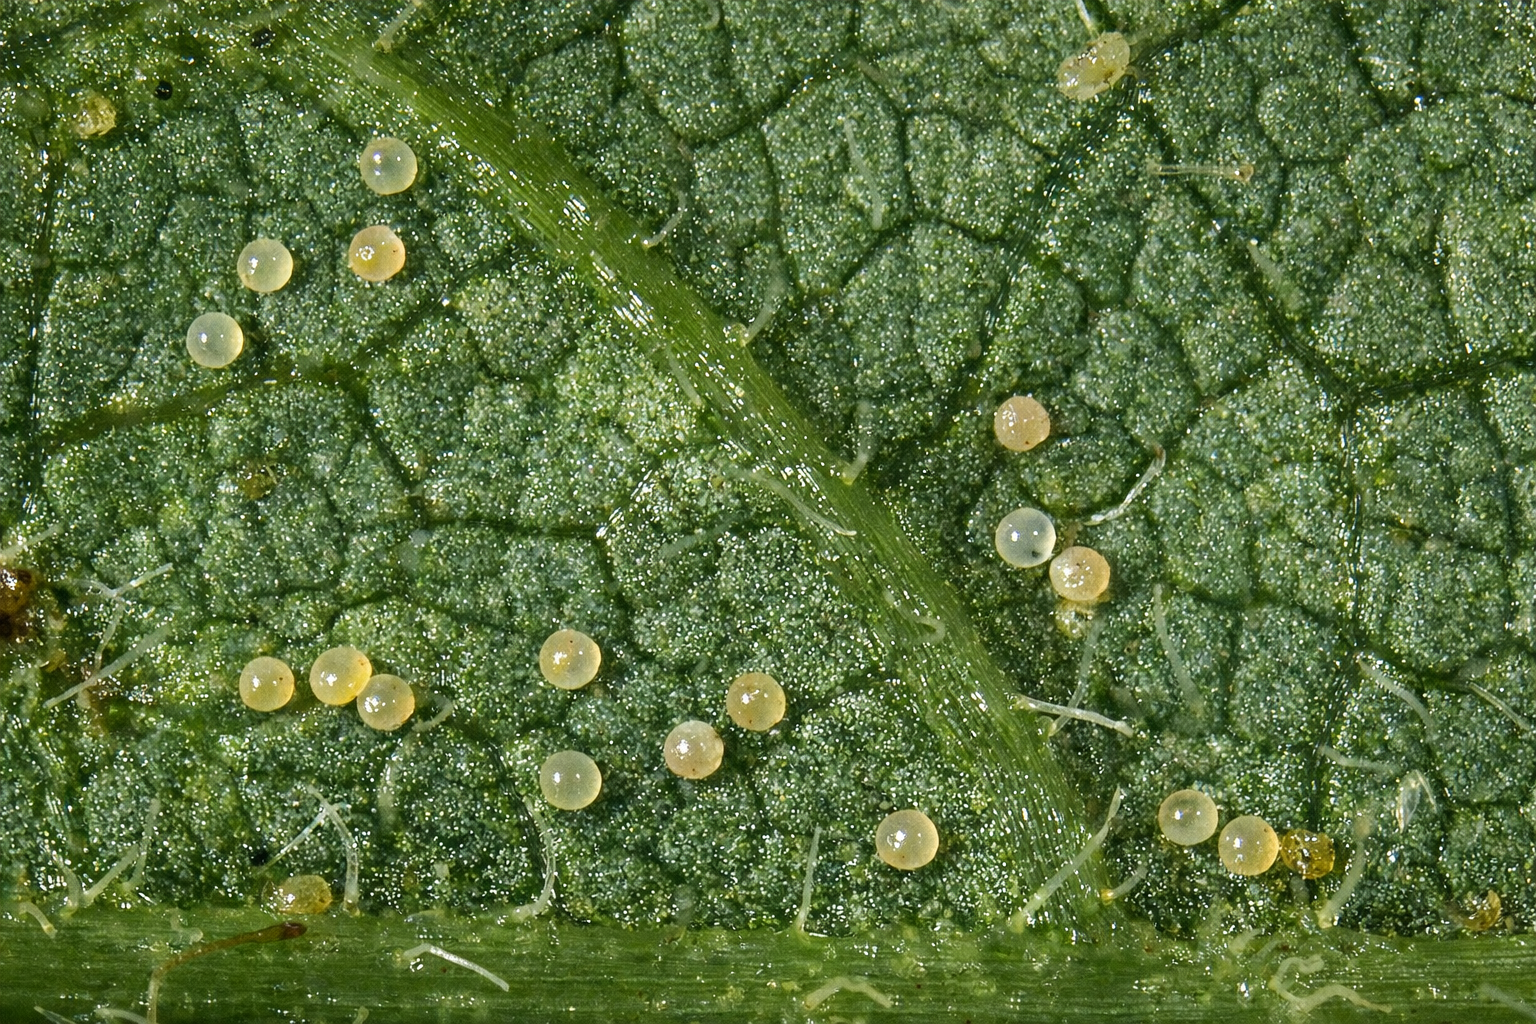
☐ Eggs: tiny, round, clear/pearly dots clustered on undersides
☐ Leaf drop or stalled growth when damage gets severe
☐ Dusty/dirty look on leaves that doesn’t wipe off cleanly (often mites + webbing + debris)
Damp Soil & Draining Trays
Find spider mites fast by checking the most common hot spots—leaf undersides, new growth, warm/dry areas, and stressed plants where spider mites thrive.
Checklist
☐ Undersides of leaves (primary inspection zone)
☐ Leaf veins and midrib underneath—mites and eggs collect along veins
☐ New growth and tender tips (mites love soft tissue)
☐ Lower canopy / inner plant where airflow is poor
☐ Nodes and stem joints where webbing starts
☐ Hot, dry windowsills and areas near vents/heaters (ideal spider mite conditions)
☐ Plants that are drought-stressed or underwatered
☐ Plants near infested neighbors (spider mites spread quickly)
☐ Outdoor plants during heat waves / indoor plants during low humidity periods
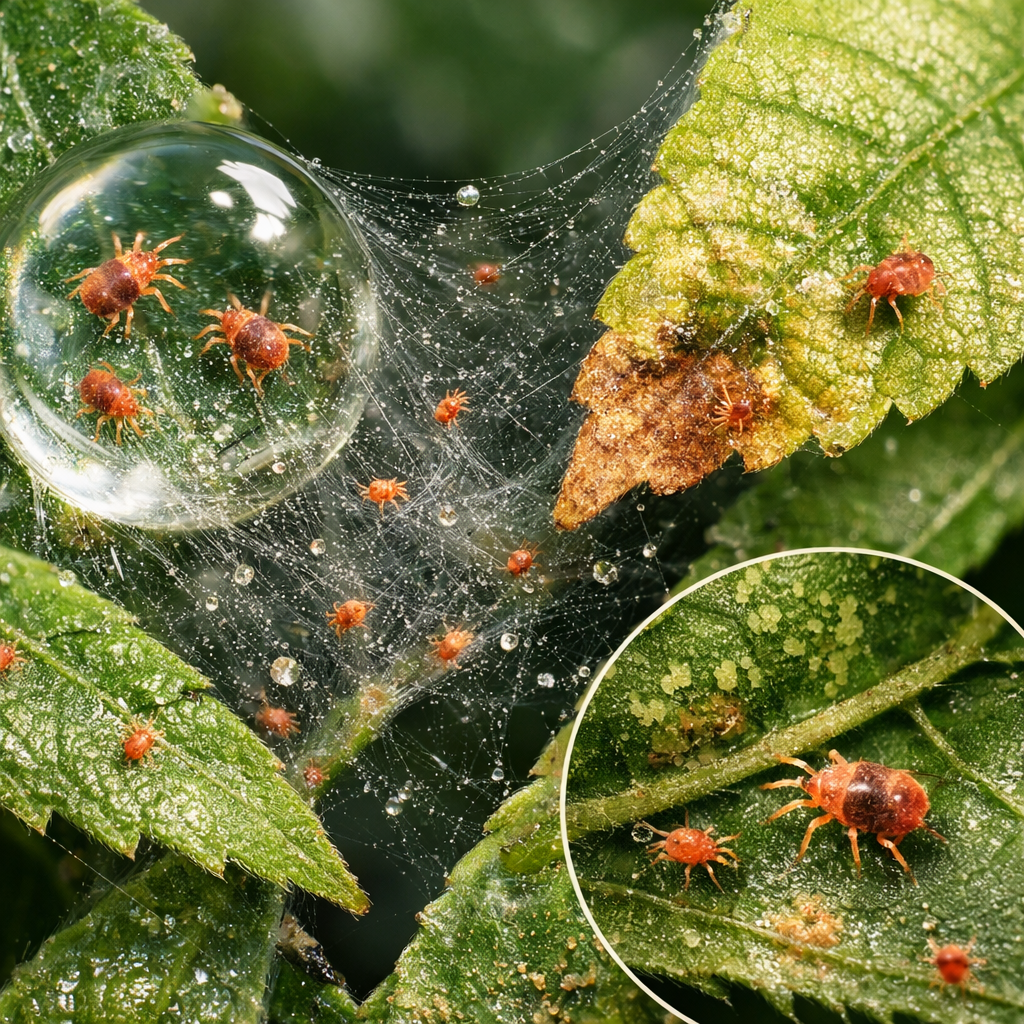
Where to look
Signs of Spider Mites
Confirm spider mites with simple at-home tests—look for moving specks, webbing, and the paper-tap test to distinguish spider mites from dust or other pests.
Checklist
☐ Paper tap test: tap a leaf over white paper; look for tiny moving dots
☐ Smear test: gently drag a finger across dots—reddish/brown streaks can indicate crushed mites
☐ Magnification check: use a loupe/phone macro to confirm mites and eggs on leaf undersides
☐ Webbing increases as infestation worsens (light webbing early, heavy sheets later)
☐ Damage pattern spreads outward from a few leaves to entire plant if untreated
☐ Hot + dry conditions = flare-ups (spider mite outbreaks often follow low humidity)
☐ Plants look “faded” or “sandblasted” from feeding
☐ New leaves emerge distorted or weak when mites target tender growth
☐ After watering, mites remain (dust rinses off; mite damage and webbing return quickly)
Spider Mites
Spider mites are tiny sap-sucking pests that can quickly damage plants by piercing leaves and draining their nutrients. Early signs include fine webbing, speckled or yellowing leaves, and a dusty appearance on foliage. They thrive in warm, dry conditions and spread fast, so regular plant checks—especially under leaves—are key to catching infestations early. Keeping plants healthy, increasing humidity, and using targeted treatments can help prevent spider mites from taking over your garden.
Spider Mite Eggs
Spider mite eggs are tiny, round, and almost translucent — often stuck to the undersides of leaves. They hatch fast in warm, dry conditions, which is why infestations can explode before you notice adult mites. If you spot clusters of small, pearl-like eggs and fine webbing, it’s an strong early warning sign to act quickly. Regular leaf inspections and early intervention are key to stopping spider mites before they spread.
Prevention Steps
Strong, healthy plants are far less vulnerable to spider mite infestations. Maintaining optimal watering, light, and nutrition reduces plant stress and makes it harder for spider mites to establish colonies.
Keep plants properly watered — avoid drought stress
Provide correct light levels for each plant type
Use balanced fertilizer to support steady growth
Avoid extreme heat and dry air conditions
Remove dead or damaged leaves promptly
1
Plant Health & Growing Conditions
Environmental Control & Humidity Management
2
Spider mites thrive in hot, dry environments. Increasing humidity and improving airflow creates unfavorable conditions that naturally discourage spider mite populations.
Maintain moderate humidity (40–60% when possible)
Use a humidifier or pebble trays near plants
Lightly mist tolerant plants to raise moisture
Improve air circulation with gentle airflow
Keep plants away from heating vents and dry drafts
Routine Inspection & Early Detection
3
Regular monitoring helps catch spider mites early, before infestations spread. Frequent inspections allow for fast intervention and prevent large outbreaks.
Inspect leaf undersides weekly
Look for stippling, discoloration, or fine webbing
Check new growth and stressed plants first
Isolate suspicious plants immediately
Wipe leaves occasionally to remove dust and pests
Cleanliness & Preventive Treatments
4
A clean growing space and preventive treatments reduce the chances of spider mites spreading. Good sanitation removes hiding spots and interrupts pest life cycles.
Clean plant leaves and surrounding surfaces regularly
Sterilize tools and pots between uses
Quarantine new plants for 1–2 weeks
Use gentle preventive sprays when needed
Remove heavily infested plant material quickly
Treatment Plan

Carefully inspect all plants to confirm spider mite activity by checking leaf undersides, webbing, and stippling damage. Remove heavily infested leaves and isolate affected plants to prevent spreading. Clean your grow area and tools to reduce reinfestation risk before applying treatment.
1) Preparation & Inspection
Apply Green Cleaner IPM as a full-coverage foliar spray, targeting the undersides of leaves where spider mites live and breed. Spray until leaves are evenly coated but not dripping. Treat during cooler parts of the day to avoid plant stress and maximize effectiveness.
2) Thorough Green Cleaner IPM Application
Repeat applications every 2–3 days for the first week to break the spider mite life cycle. Continue monitoring plants closely for new activity, focusing on hot spots and new growth. Early detection and consistent follow-up are key to complete control.
3) Follow-Up Treatments & Monitoring
Improve airflow, maintain proper humidity, and reduce plant stress to make conditions less favorable for spider mites. Keep your grow space clean and inspect plants regularly. Preventive maintenance helps stop future outbreaks before they start.
4) Prevention & Environmental Control
Frequently Asked Questions
-
Spider mites can infest a wide range of plants including vegetables, fruit trees, vines, berry bushes, ornamentals, and indoor houseplants. They often appear where conditions are hot and dry.
-
Yes. Spider mites spread by crawling, wind, tools, clothing, and contact between plants. Once one plant is infested, nearby plants are at high risk.
-
Spider mites feed by piercing leaf cells and sucking out contents, causing stippling, discoloration, leaf drop, stunted growth, and, in severe cases, plant death.
-
Spider mites thrive in hot, dry conditions because these environments speed their reproduction and stress plants, making them more vulnerable.
-
Spray plants with Green Cleaner IPM to get rid of mites.
Increase humidity around plants.
Incorporate a weekly IMP to prevent and control mites
-
Most spider mites live on plant foliage, especially leaf undersides. They may temporarily hide in soil or debris, but they primarily survive and reproduce on leaves.
Need a Product?

Root Cleaner
Fast and effective soil drench that helps eliminate fungus gnat larvae, flush out root-zone buildup, and support healthier plant roots for stronger growth in houseplants, raised beds, and container gardens.
Green Cleaner
Safe and effective integrated pest management (IPM) solution for natural & non-toxic pest control—helping you prevent and treat common garden pests like aphids, spider mites, whiteflies, and fungus gnats while protecting plants